How to Manage Roybal
This is going to be a long document so it'll be split up into chapters to make jumping to certain parts easy and simple
Table of Contents
| Chapters | Links |
|---|---|
| 1. Installation Guides | Installation Guides |
| 2. Where to Find Everything | Where to Find Everything |
| 3. Running The Program | Running The Program |
| 4. Database Management | Database Management |
| 5. Misc Info | Misc Info |
| 6. Protocol | Protocol |
| 7. Fitbit and Platform Set Up | Fitbit and Platform Set Up |
1. Installation Guides
Local Installation
On your local computer, make sure you have the following things installed on your side:
- Bun:
- Bun is a Javascript runtime environment, its essentially a better version than Node.js if you're familiar with it
- You can install Bun through this link
- To run a javascript file, type in your terminal / command prompt the following:
bun index.js
- Git:
- Visit the repo where the site is held and clone the repo to your computer
- MongoDB Compass:
- You could use the web browser too if that works out for you, I prefer the application itself
- From this Link you can access the collections (tables of data) through clicking on "Browse Collections".
- If you chose to use the application Compass, use the correct connection string:
mongodb+srv://skyehigh:KR65fmTreB0LKVyc@cluster.evnujdo.mongodb.net/ - If anything looks incorrect, you'll be tasked with fixing it. Usually someone will bring it up to you first. If you need any help figuring out how to fix something then let me know
Cluster Installation
Next lets check out what you need installed on your home page in the Discovery Cluster:
- Node
- To install node on the cluster we're gonna need some interesting workarounds since they don't provide it naturally. If you want any assistance going through these steps feel free to let me know
- Visit the git repo for NVM (Node Version Manager) and copy the installation line
- Should look like this
curl -o- https://raw.githubusercontent.com/nvm-sh/nvm/v0.39.7/install.sh | bash
- Should look like this
- Log in to the cluster and run this install script in your home directory
- Run
source ~/.bashrcto reset your terminal - Type
nvm install 16, thennvm use 16 - If it switches to node version 16, then you have succeeded!
- Reminder, every time you log to the cluster to do something with the site, ALWAYS RUN
nvm use 16
- Visit the git repo for NVM (Node Version Manager) and copy the installation line
- PM2
- Once you have node installed on the cluster, we're going to need to install the package that automatically runs the server for us on the cluster.
- While you're in Node Version 16 ( type in
npm install pm2) - When you install pm2, go to your home directory and enable the checkbox that says "Show Dotfiles"

- Find the .pm2 directory
- Enter the logs directory
- It may be empty right now, but when you use it, you'll see two files. The out file is where all of the print statements and console logging end up. The error file is where any application error ends up. Its good to know where these are for debugging purposes.

- To install node on the cluster we're gonna need some interesting workarounds since they don't provide it naturally. If you want any assistance going through these steps feel free to let me know
2. Where to Find Everything
Code
The code is currently on github, clone the repo and install all the dependencies you need from Node. In the cluster, the code is currently in the repo path of /work/cnelab/roybal/roybal-website/code
Whenever you push a new change onto the website, you are refreshing the instance of the code being ran on the Vercel website hosting platform. Vercel is what we are using to host the platform in a viewable state, the cluster is being used to automate the timely procedures, such as data collection and reminder messages.
As is practice, always remember to communicate when there is a new push to the codebase so we can make sure to pull the new changes to our own local.
The database being used is MongoDB, a free cloud service database that the platform connects to send and retrieve information. You should have access to the database. You can connect either through the provided link : Database Link or through connecting through the MongoDB Compass application using the connection string: mongodb+srv://skyehigh:KR65fmTreB0LKVyc@cluster.evnujdo.mongodb.net/. I prefer the app just because its easier to see and make quick edits as needed, but you're free to use whichever you're most comfy with
3. Running The Program
Something VERY important to bring up is that even though the code you share is all synced up through git, the code in the cluster is not synced up. If you have a new change that DOES NOT AFFECTS THE AUTOMATED JOBS, then there is no need to keep them in sync. If you introduce a change to those automated Cron jobs, then you must change the code that is within the cluster and run pm2 restart index. This will restart the running application and reapply those new changes you've added.
All of the work you need to do if it comes to bug fixing should be stuff you can do on your local. You will very rarely if ever need to update anything with PM2. Just in case though, its good to be prepared
Most bug fixes will either be issues on the front end - back end information sending, or something in the database itself.
Local
-
I strongly recommend getting familiar with the index.js code file because that is the most intensive part of the website. It is where all the web routes are stored, where all the cron automated tasks occur, and where all the database processing occurs
-
Most work on the local involves changing front-end code or changing anything in the index.js file, which is our server component to the website. Its the backend magic where everything happens.
-
Sometimes there might be an issue where the data collection does not happen or a text reminder failed to send. What you can do in your local is this:
- Add one of the following lines to the END of the index.js file
await fetchAndProcessData()for data collectionawait processPlans()for plan and reminder processingawait processPoints()for point calculations (usually follows the one or both of the previous two)
- Once one or all of these lines are added, save the file and in your terminal run the command:
bun index.js. This will execute these functions and update the database results. - Once you are done, remove those lines from your code. We do not want these lines in the codebase, these are simply bug fix solutions
- Add one of the following lines to the END of the index.js file
-
If you have any more questions or need me to write more into this portion, feel free to let me know
4. Database Management
The database is where all the fun and pain begins! Once you log in and click on "browse collections", you will see the Roybal database. The database is now serving two functions, and can continue to serve more as new studies get added in. For now lets focus on the Roybal specific collections
In Mongo, a collection is essentially a table. I will be using Mongo terminology from this point onward.
Here are the collections that are currently in the database as of June 10th 2024

Our main priorities are : - admin - stores the log in information for the website admin side. The correct log in for the Roybal admin site is the second data entry
-
data - stores the daily data collection from the Fitbit API. This is the raw data we are getting from Fitbit and should not be touched unless there is a bug, let me know when this happens.
-
health - currently empty, don't worry about it
-
participants - holds participant information for data collection purposes. Sometimes a new participant may have an incorrect number, make sure everyone has their own unique number and that it increments correctly. This number is used in 2 other places too so ensure there is consistency between numbers and ID's
-
plan - holds information on planned call days, planned activities, and activities that were done. This is used for point calculation and to update the calendar on a participants site. We link a participants ID and their contact information through their "number". Ensure consistency between number and ID and contact identifier
-
sessions - stores website information, don't worry about it
-
users - stores general purpose information about a user and their log in information. Make sure there is consistency between numbers and ID's
-
weeklyPoints - stores each users weekly points to update their line graph
Ensure there is consistency within the database, collaborate with each other and refer to me with any complications
Missing Data Entries
One of the biggest issues is sometimes a data entry will be missed. If this happens refer back to Running the Program for what code to add and how to run it.
Sometimes the database will be missing an entry due to an issue with collection. This happens sometimes, feel free to let me know. What you need to do is manually insert a new document into the data collection. Click on "ADD DATA" then click on "Insert New Document". Below is a template on what to insert
{
  "user_id": Insert Fitbit ID here (As a String),
  "date": Insert Date here (As a YYYY-MM-DD String),
  "activities": [
    {
      "activityId": 90013,
      "activityParentId": 90013,
      "activityParentName": "Walk",
      "calories": 1829,
      "description": "Walking less than 2 mph, strolling very slowly",
      "duration": 14233000,
      "hasActiveZoneMinutes": true,
      "hasStartTime": true,
      "isFavorite": false,
      "lastModified": "2024-06-06T00:14:36.000Z",
      "logId": 63921524675,
      "name": "Walk",
      "startDate": Insert Date here (As a YYYY-MM-DD String),
      "startTime": "15:57",
      "steps": 22984
    }
  ],
  "goals": {
    "activeMinutes": 30,
    "caloriesOut": 2602,
    "distance": 8.05,
    "steps": 10000
  },
  "summary": {
    "activeScore": -1,
    "activityCalories": 2442,
    "caloriesBMR": 1743,
    "caloriesOut": 3788,
    "distances": [
      {
        "activity": "total",
        "distance": 19.22
      },
      {
        "activity": "tracker",
        "distance": 19.22
      },
      {
        "activity": "loggedActivities",
        "distance": 0
      },
      {
        "activity": "veryActive",
        "distance": 16.76
      },
      {
        "activity": "moderatelyActive",
        "distance": 0.72
      },
      {
        "activity": "lightlyActive",
        "distance": 1.71
      },
      {
        "activity": "sedentaryActive",
        "distance": 0
      }
    ],
    "fairlyActiveMinutes": 26,
    "heartRateZones": [
      {
        "caloriesOut": 1159.39162,
        "max": 112,
        "min": 30,
        "minutes": 539,
        "name": "Out of Range"
      },
      {
        "caloriesOut": 1808.51534,
        "max": 140,
        "min": 112,
        "minutes": 236,
        "name": "Fat Burn"
      },
      {
        "caloriesOut": 0,
        "max": 175,
        "min": 140,
        "minutes": 0,
        "name": "Cardio"
      },
      {
        "caloriesOut": 0,
        "max": 220,
        "min": 175,
        "minutes": 0,
        "name": "Peak"
      }
    ],
    "lightlyActiveMinutes": 123,
    "marginalCalories": 1660,
    "restingHeartRate": 57,
    "sedentaryMinutes": 1060,
    "steps": 26447,
    "veryActiveMinutes": 231
  }
}
After you do this, go into the plan collection and find the correct participant based on their participant number. Go to their completedUnplannedActivities field and then delete the date that corresponds to the date of the new data entry that you just added. Go to their completedPlannedActivities and add in the activity into the list. Here is a template for an activity
{
      "activityId": 90013,
      "activityParentId": 90013,
      "activityParentName": "Walk",
      "calories": 1514,
      "description": "Walking less than 2 mph, strolling very slowly",
      "duration": 11929000,
      "hasActiveZoneMinutes": true,
      "hasStartTime": true,
      "isFavorite": false,
      "lastModified": "2024-06-04T00:04:56.000Z",
      "logId": 63877453590,
      "name": "Walk",
      "startDate": Insert Date here (As a YYYY-MM-DD String),
      "startTime": "15:47",
      "steps": 18848
    },
After you do this, add the final two lines into the index.js file in the roybal codebase and run bun index.js:
await processPlans()
await processPoints()
5. Misc Info
I can't actually think of anything but thanks for reading good luck out there soldiers o7. I'm always here to consult with so have no fear.
6. Protocol
Prior to Baseline- Inquiry/Interest etc.
Sources - RedCap form for interest - Links to it from the QR code on flyer or Facebook/Instagram ads - After reaching out via email to schedule call, label email under Roybal to notate it is present in RedCap - Calls/Emails - Directed to either Google Voice number or lab email - Add to RedCap regardless of eligibility - Email is labeled under Roybal once it is added to RedCap and PSL - The RedCap form should eliminate inclusion/exclusion on age and length of time since brain injury - If ineligible, send an email using the template to tell them we appreciate their inquiry, but they are not eligible at this time.
Redcap: - Entering New Participant - Participant should begin with inquiry (whether on the phone, email, or online survey (where it’s completed automatically)) in Arm 1 - Add participant to prescreening log in OneDrive and complete prescreening under Arm 1 in RedCap
Pre-Screening Call- Will Not Be Completed by UGAs
- Attempt to confirm a scheduled call over email before calling, if possible, if not simply call during appropriate business hours
- Use RedCap form for Prescreening and go through the criteria as questions
- If unsure, leave a comment or note on the redcap form
- If they flag one of the immediate inclusion/exclusion factors you do not have to continue the call (walking aid, not cleared for exercise, or location (if they can travel to Boston for the baseline without any financial help from us but live elsewhere, that can work))
- If unsure, finish the call and consult Lexie or Goretti afterward.
- Complete the MRI Subject Screening Form to ensure they can safely have an MRI (Either done on the computer or a hard copy can be printed and scanned in)
- This needs to be de-identified and provided to Fred.
- Fill out the hard copy OSU form.
- All of these are de-identified and sent to Lexie MD to confirm eligibility.
- If there is any uncertainty on diagnosis, wait to schedule until Lexie MD verified
Potential “Holding Patterns” That Can Occur In Between The PS Call & Scheduling Baseline - Awaiting Lexie MD confirmation on diagnosis - Confirm MRI safety with Fred/Valur or participant - Participant needs to confirm exercise safety with PCP or cardiologist - Participant needs to arrange travel (emphasizing we do not cover this, but they do voluntarily)
Scheduling Baseline Session - Should be done with or by Goretti or Lexie - Scheduled primarily due to MRI availability (accessed through Lexie or Goretti outlook calendar) as that’s the most restrictive - Secondly confirm Goretti/Lexie, Mark, and one of the undergrads availabilities - If necessary to be in 2 sessions for any reason, try to have as close together as possible - Remind of session 24-48 hours prior
Preparing for Baseline - Ensure proper rooms are scheduled for Baseline - Neuropysch Room for cognitive/questionnaires - Have this reserved for after EEG as well for the tech set-up - EEG in EEG Room (Preferably 672H) - Print documents in Print for Baseline - Informed Consent (Print 2, 1 for our copy and 1 for participant to take home) - MMSE Handout - W9 - Roybal Password Doc - TMT A/B paper copy - Letter/Cat Handout - HVLT Handout - Charge Surface Tablet - Have likert scale handout ready/in room
Baseline Session
- Consent & W9
- Go through consent form and provide them a copy with the person administering the consent signing (the important thing is to have the copy we keep having both signatures and they one they take home having our signature)
- Have them complete the W9 at this time as well
- MRI
- MRIprotocol.docx
- Questionnaires/Cog Tasks
- Health History and Demographics
- MMSE
- Letter and Category Fluency
- FAS
- TMT
- Digital- C/D
- Paper- A/B
- International Physical Activity
- Full form
- Hopkins Verbal Learning Test**
- Form 1
- Done at the beginning and followed 20 minutes later with delayed recall/recognition
- 3 Learning Trials & Recall
- Promis
- Mediterranean Diet Adherence
- Pittsburgh Sleep Quality Index
- BREQ-3 Physical Exercise Motivation
- Physical Exercise Self Efficacy
- Hopkins Verbal Learning Test
- Delayed Recall & Delayed Recognition
- EEG
- Finish Questionnaires
- GAD-7
- PHQ-9
- Sensitivity with subject matter!
- Fit-Bit Set-Up
- Fitbit setup procedures.docx
- Platform Set-Up
- After FitBit is ready, go to platform
- Go through steps at the top of the admin page
- Before this make sure you are LOGGED OUT of any FitBit account, even if for the current participant
- This will connect FitBit to the platform and create a new user
- This is done successfully when the screen is white with “Action Executed” text at the top
- MongoDB Info
- MongoDB Info & Troubleshooting.docx
- Access MongoDB to confirm link and add user login
- Database-Data Collections-User
- Delete last row “user: #” NOT “number: #”
- Add new row underneath password “User: USERID” (The string that is under user_ID under the same box for the participant, usually starts with B)
- Confirm login to platform is successful
- Add plans (or planned call for control group) for the upcoming week
- Return to admin page to add reminders to personal gmail/phone
- Add in same box below add plan and ensure to put the SAME participant ID (this is the number)
- IF shows up in participants but not user:
- Go into user and add new document:
- {"_id":{"$oid":"66169bb95af35a66285e538e"},"user_id":"insert user id","number":{"$numberInt":"insert number "},"group":"experiment or control","pass":"cnelab","user":"user id"}
- Copy and paste above code or duplicate the existing template in database (number is 0)
- Go into user and add new document:
Redcap
- At the end of the Baseline visit, the participant is randomized
- Create a new record is created in the appropriate arm (control or intervention)
- After creating, click  and select rename record
- Rename to the record ID number to their Participant ID (this is different than the prescreen ID and will be determined based on Participant Tracker spreadsheet) in their intervention arm
and select rename record
- Rename to the record ID number to their Participant ID (this is different than the prescreen ID and will be determined based on Participant Tracker spreadsheet) in their intervention arm
Weekly Calls
Weekly Call Script.docx
- Prior to call, check that CSV has full data/the FitBit is syncing
- For intervention, check that it matches the platform
- Basecamp
- Card Table for each participant
- Card itself has the participant’s login info and ID
- After completed, check off call and add due date for the next week’s call
- Add yourself as the person and Goretti or Lexie so we are notified!!
- If the call is rescheduled at any point, please update the basecamp due date so we know!
- Rescheduling
- If the participant doesn’t answer (usually call at the time and then again 15 minutes later) please send them a text message or voicemail stating that you tried to call and to please respond with a good time to reschedule the call too.
- Participant Log- (Not done by UGAs, currently by Goretti)
- Date call is scheduled for is added and then highlighted green once completed
Redcap Phone Call Tracker- Only if Adverse Event is noted, follow script procedure
- Create new event for each check-in call on redcap and enter date
 - Fill out adverse event form as needed (follow script instructions)
Endpoint Call
Prior To Call:
- Schedule
- Scheduling happens after week 11 call (scheduling week 12 of walks or reading tip #12)
- Lexie will contact participant to schedule
- Intervention Group
- Prep Microincentive Total
- Download CSV from platform
- Confirm data overall against FitBit data (should be done periodically prior anyways)
- Print Documents
- Letter/Category Fluency CFL Form
- HVLT Form 2
- Payment Invoice
- Have Likert scale PowerPoint up to share screen during call
- Have W9 to confirm mailing address
On Call:
- Questionnaires/Cog Tasks
- Letter and Category Fluency
- CFL
- International Physical Activity
- Full form
- Hopkins Verbal Learning Test**
- Form 2!
- Done at beginning and followed 20 minutes later with delayed recall/recognition
- 3 Learning Trials & Recall
- Promis
- Mediterranean Diet Adherence
- Pittsburgh Sleep Quality Index
- BREQ-3 Physical Exercise Motivation
- Physical Exercise Self Efficacy
- Hopkins Verbal Learning Test
- Delayed Recall & Delayed Recognition
- GAD-7
- PHQ-9
- Sensitivity with subject matter!
- Go over shipping & Payment instructions
- Confirm shipping address (from prescreen and/or W9)
- Inform them they will receive a package with a padded envelope to put the FitBit back into to mail back. The invoice for payment will also be in the envelope for them to sign and return in the same envelope as the FitBit.
- If they don’t have the FitBit box or do not know where it is, that is okay just ensure they send the actual FitBit device and the charger (and the extra band if they have it but if they don’t have the box, they likely won’t have this)
After Call:
- Update payment total with endpoint time (usually ~1 hr) and fill out invoice with total payment
- Send link for post-participation survey
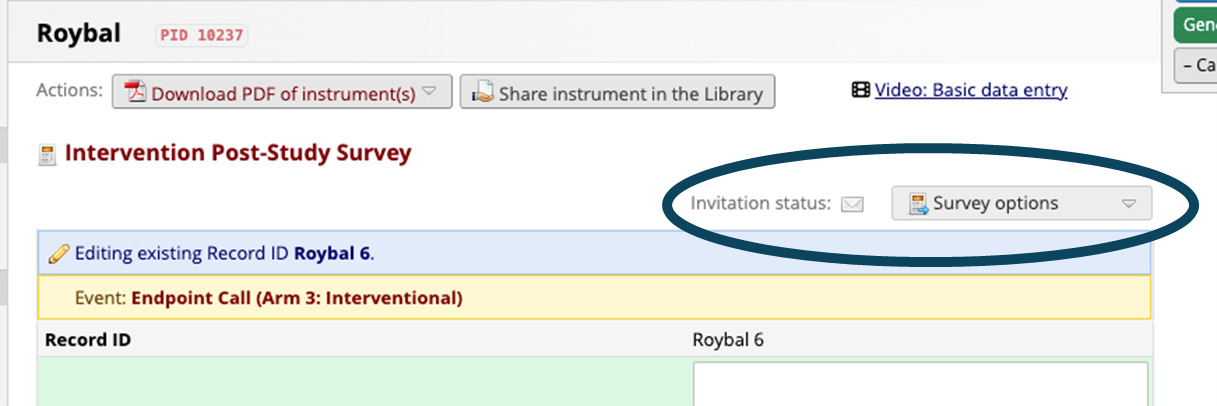
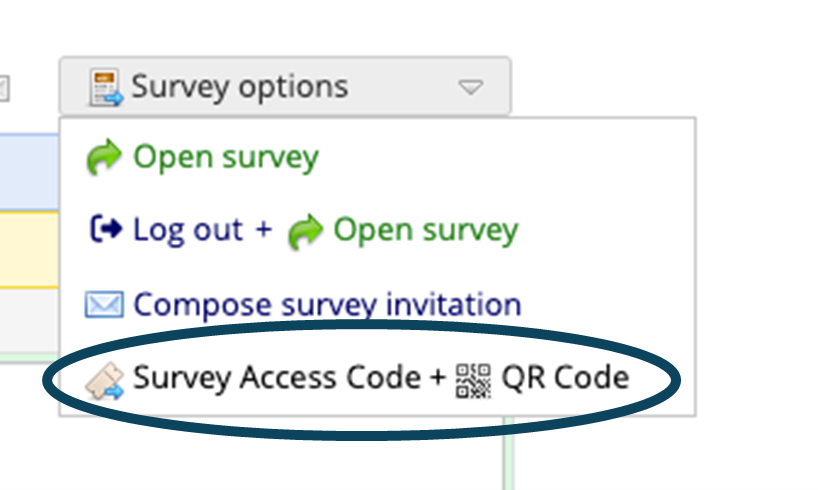
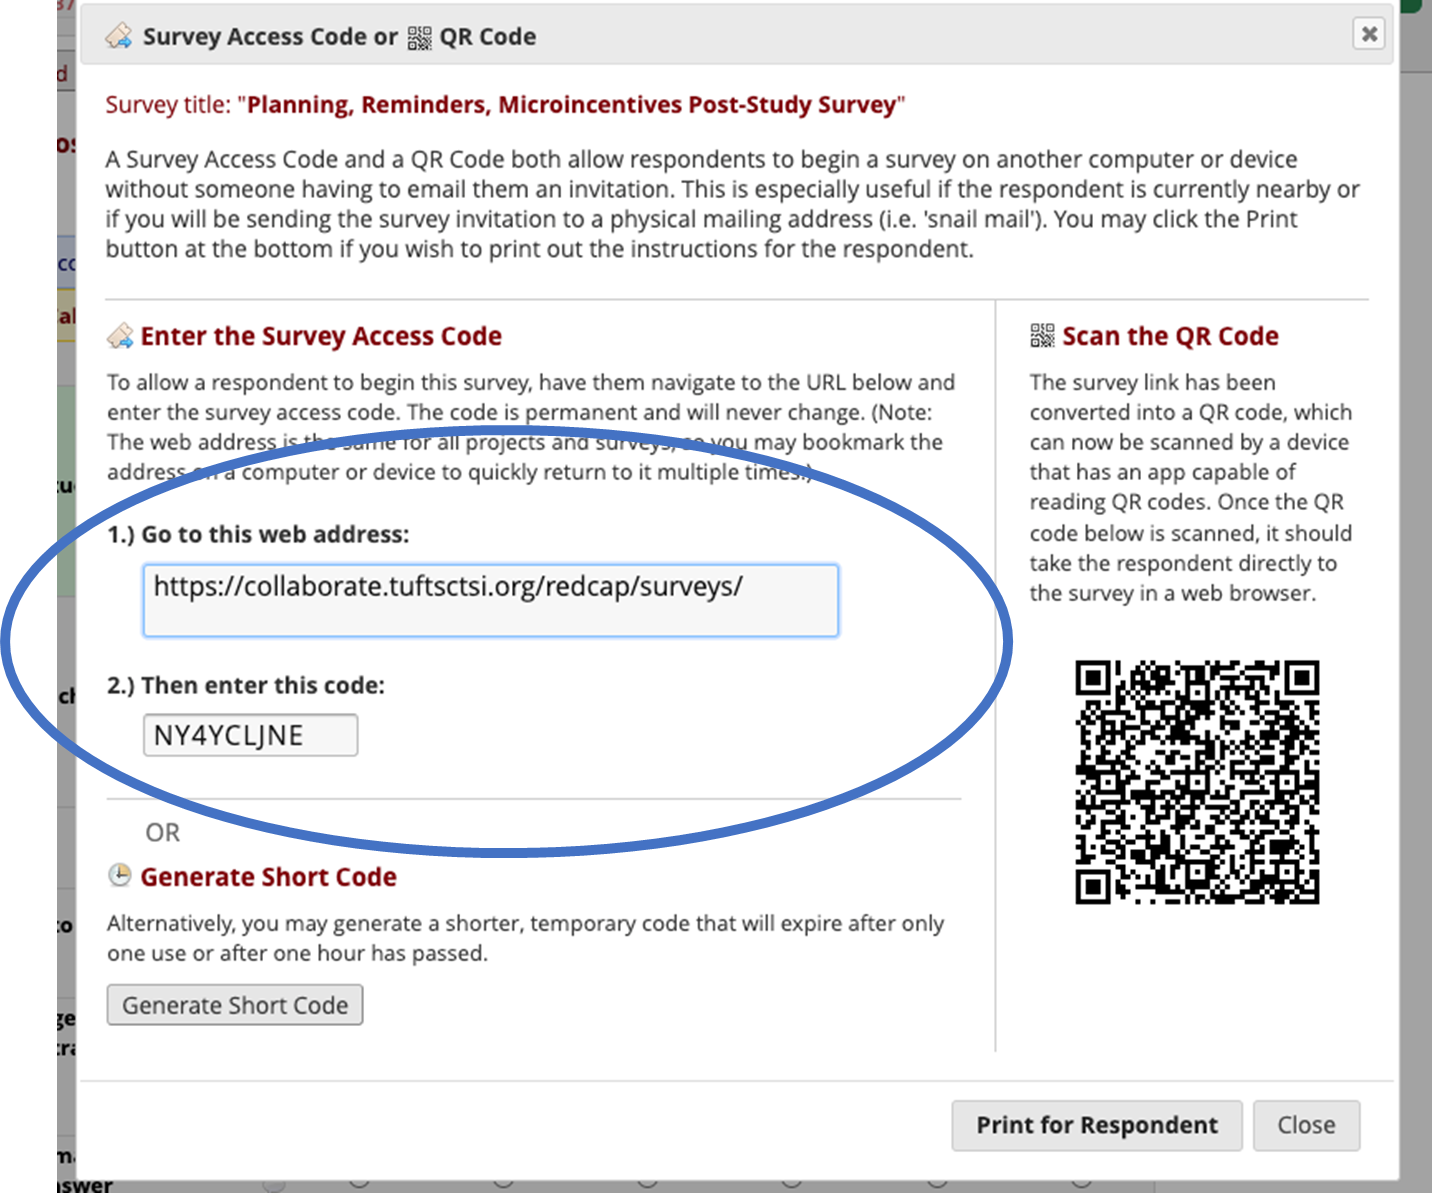 - Send web address and survey access code to participant via email
- Send Envelope
- Padded Envelope Inside to Return FitBit
- Already pre-addressed to send back to ISEC with stamp
- Invoice to Sign and Send back w/FitBit
- Update Participant Tracker
- Update Status to completed
- Send web address and survey access code to participant via email
- Send Envelope
- Padded Envelope Inside to Return FitBit
- Already pre-addressed to send back to ISEC with stamp
- Invoice to Sign and Send back w/FitBit
- Update Participant Tracker
- Update Status to completed
7. Roybal Fitbit and Platform Set Up
Set up Fitbit and Roybal Platform Procedures
-
Ask participants to download Fitbit App on their phones.
-
Create new Gmail account on participant’s phone. tbiparticipant1@gmail.com / cneparticipant1@gmail.com (add the information in their info document, and here: https://northeastern.sharepoint.com/:x:/r/sites/CNElab/_layouts/15/Doc.aspx?sourcedoc=%7B281F8B41-ACE0-4BC7-BC28-55659B4775CC%7D&file=Roybal%20Participant%20Tracker%20%26%20Call%20Log.xlsx&action=default&mobileredirect=true)
-
Fitbit (if has been used then clear Fitbit)
a. Log in with Gmail participant account (https://accounts.fitbit.com/login).
b. Set up profile info.
c. Fitbit is ready to be used.
d. Research question: "No, thanks"
e. Turn off all the notifications.
f. You are all set!
g. Remind the participants to keep their Bluetooth on during the whole study.
h. Show them how to activate Fitbit screen touching the sides with both fingers, or tapping on the screen then to click through it.
i. If you swipe down you can also revise and change other things, but it’s not necessary.
j. You do not have to sleep with it, just if you want to take some sleeping data. Just use it during your active hours, when you take walks, etc. Take it off during showers just in case.
k. Remind them to wear it on the non-dominant wrist.
l. Show them how to use the app, walk them through the different windows.
-
Activate Bluetooth on participant’s phone.
-
Open Fitbit App on their phone
a. Sign in with Google.
b. Add another account: cneparticipant5@gmail.com / password: computationalneuroscience5 and “Continue as a Participant 5.”
c. Don’t allow Fitbit to send you notifications.
d. Once connected to Fitbit is time to connect to a device. Add device > Inspire 3 > Agree to connect Inspire 3 to the Fitbit App > Allow Fitbit to use Bluetooth for new connections in Settings.
e. To synch the device with the Fitbit app you will get a 4-digit code on your device’s display. Add the 4-digit code and accept.
f. Skip the rest of notifications and permissions that the app asks and skip the premium membership suggestion.
-
Create new participant profile in the Roybal app.
-
(https://roybal.vercel.app/admin) a. Add new participant (either intervention or control profile!)
b. Log in into Fitbit (continue with Google account)
c. Authorization screen: click Allow All
d. "Experimental Action Executed"
e. Revise if the participant has been added in MondoDB and our platform and add the user name in the excel (https://northeastern.sharepoint.com/:x:/r/sites/CNElab/_layouts/15/Doc.aspx?sourcedoc=%7B281F8B41-ACE0-4BC7-BC28-55659B4775CC%7D&file=Roybal%20Participant%20Tracker%20%26%20Call%20Log.xlsx&action=default&mobileredirect=true). https://account.mongodb.com/account/login?n=https%3A%2F%2Fcloud.mongodb.com%2Fv2%2F6487b3420908a04e759c5fe5&nextHash=%23overview&signedOut=true
f. Then “Or add a new email” and add participant5@gmail.com and number to the “Participant Number"
g. Check if the account has been correctly synched to the Atlas and code under “users.”
-
Provide a note to the participant with their:
a. Email address account: tbiparticipant5@gmail.com
b. Password: computationalneuroscience5
c. Their real ID: BZ559v (provided by the website of users and code)
d. Password: cnelab
-
Open Roybal platform.
a. Add personal phone number and/or email to get the reminders.
b. Show them the platform, how the health tips/activities show up and how to access it.
c. Plan the next week walk
d. Repeat the process twice with Roybal email address to add the dates into Roybal’s calendar app and repeat scheduling with their personal emails to get the notifications in their devices.
e. Walk the participant through the platform to explain to them how to check and revise calendar, etc. Also show them how to charge the Fitbit.
f. Remember to sync your Fitbit with your phone app daily please!